
Configurable security + branding gates cardholders pass through before their card is usable.
You create an activation profile (branded messaging, verification fields, or both), publish it, and apply it as the default for a program or across an entire superbusiness. From then on, every card issued under that business goes through the profile's activation flow before the cardholder can spend a dollar, unless a specific card is issued without the default (opt out in the dashboard, or pass applyActivationDefault: false on the API issuance request).
Why use activation profiles
- Custom onboarding moment. Show cardholders your logo, brand, and program-specific messaging before they can spend, without needing to build a custom app.
- Prevents misuse. A lost or intercepted card cannot be activated by the wrong person when verification is required, protecting cardholder funds and reducing fraud liability for you and for GiveCard.
- Program-specific eligibility. Enforce rules that make sense to your unique program like "only cardholders whose applicant ID matches your roster can activate."
- Flexible scope. Configure per-program or across an entire superbusiness, so different populations can have different requirements.
What's on a profile
An activation profile is composed of one or more of the following:
- Informational page (optional): a page the cardholder sees during activation, with your logo, custom branding, and any messaging you want them to read before continuing.
- Verification fields (optional): pieces of info the cardholder submits to prove they're the intended recipient. For example, date of birth, email, ZIP code, or applicant ID. Each field has a type (
text,email,date,number, orphone) and a label. - Verification field logic (required when the profile has more than one verification field): either
and(cardholder must match every field) oror(cardholder must match at least one). Usenonewhen the profile has no verification fields.
Profiles can be informational-only, verification-only, or both. They're created in draft status and don't affect anything until you publish them. Only published profiles are ever applied at card issuance.
Setting up a profile
Activation profiles are configured in the GiveCard dashboard, not via the API:
Navigate to Settings > Custom Activation within your GiveCard dashboard to create your custom activation profile.
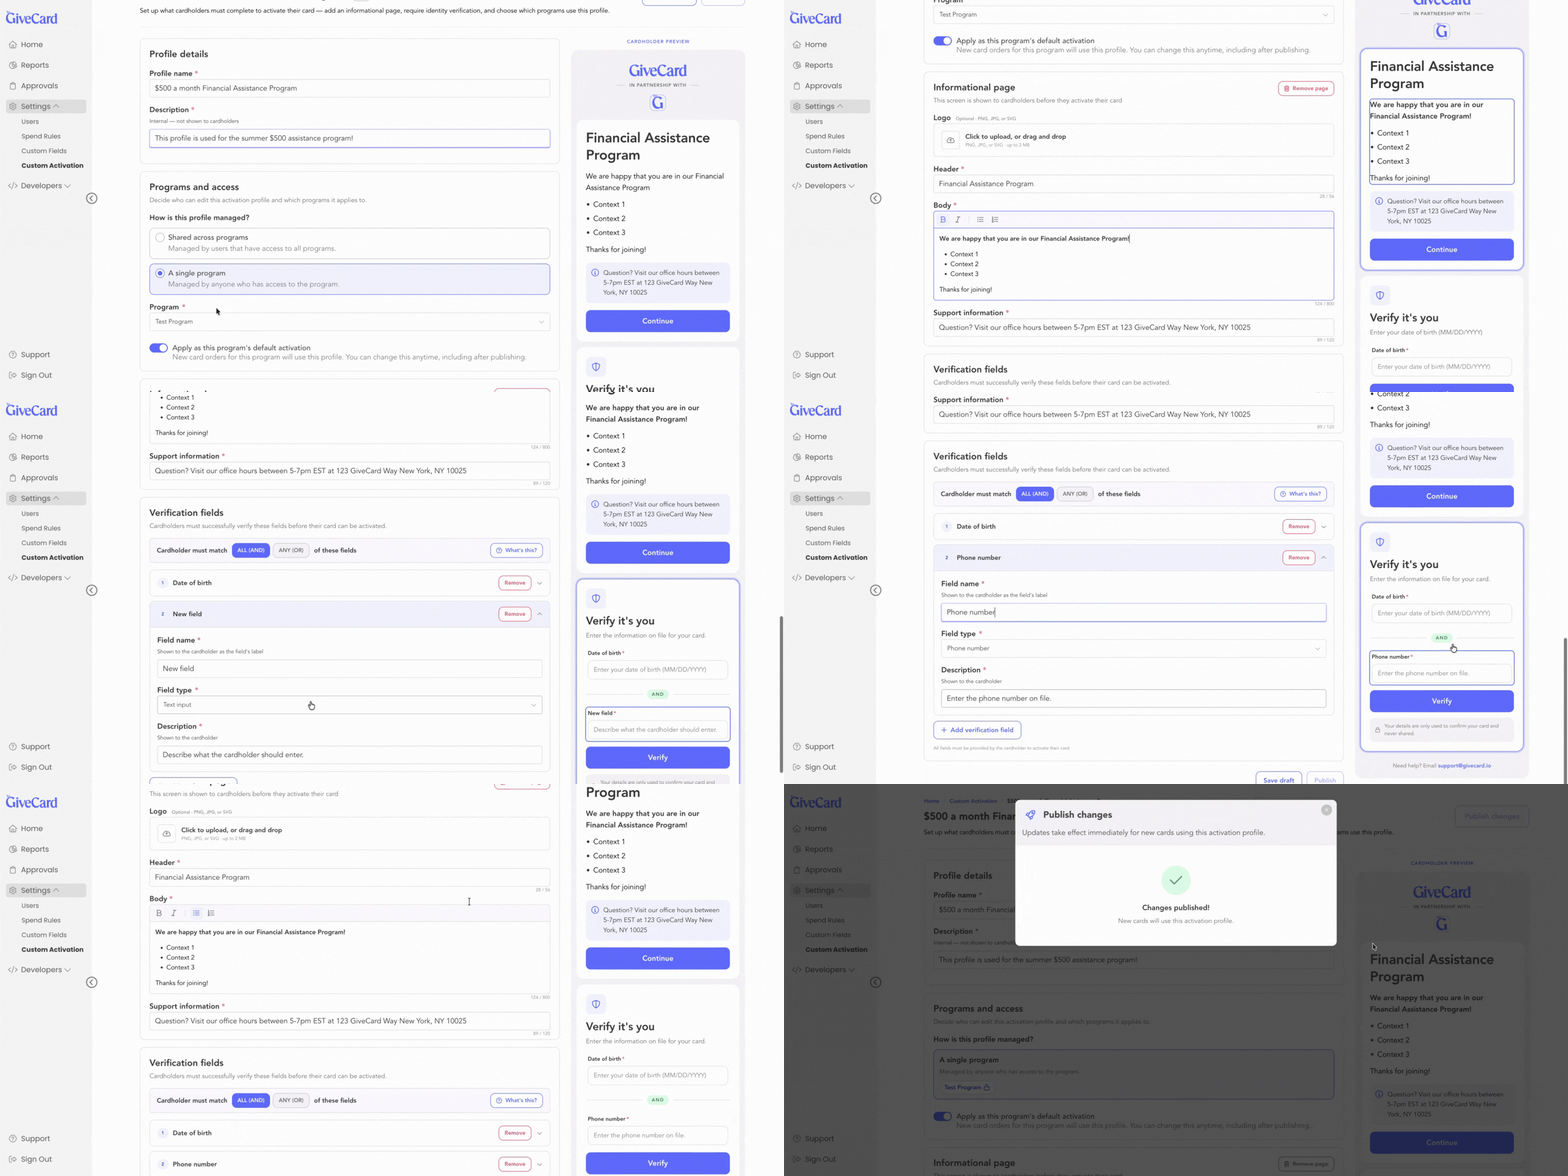
- Create the profile with a name and description
- Create/attach an informational page (optional)
- This is where you can really customize your screen by including your logo, description of your program, your support contact, etc…
- Create/attach verification fields (optional)
- Use whatever verification data that you already have! You can create verification on email, phone number, date of birth, or if you have unique case ids you can use the ‘text’ field.
- Publish the profile. To publish, there needs to be at least 1 verification field or an informational page attached. There can be both, but not neither.
- Draft profiles are never applied at issuance.
- Assign it as the default at the program level or the super level. Program-level defaults win over super-level defaults when both are set.
- The important decision here is whether you will want to use the same profile across multiple programs or for one program only. The other important thing to establish is who you give access to edit this profile. More details in the Permissions section.
Using it in the API
Card issuance endpoints (single virtual card, bulk virtual card, or physical card order) accept two related fields:
applyActivationDefault(boolean, defaults totrue): whether the business's default profile applies to this request. Set tofalseto skip it.verificationData: the per-card values the cardholder has committed to. Required when a default profile applies and the profile has verification fields.
verificationData is an array of arrays. Outer = per-card; inner = verification values for that card:
{
  "applyActivationDefault": true,
  "verificationData": [
    [
      {
        "verificationFieldId": "8f2f1a3c-4b5d-4e6f-90a1-b2c3d4e5f6a7",
        "value": "1785-04-12"
      },
      {
        "verificationFieldId": "b71c2d3e-5f6a-4b7c-8d9e-0f1a2b3c4d5e",
        "value": "[email protected]"
      }
    ],
    [
      {
        "verificationFieldId": "8f2f1a3c-4b5d-4e6f-90a1-b2c3d4e5f6a7",
        "value": "1888-11-03"
      },
      {
        "verificationFieldId": "b71c2d3e-5f6a-4b7c-8d9e-0f1a2b3c4d5e",
        "value": "[email protected]"
      }
    ]
  ]
}
If every card in the order should have the same values, pass a single inner array and it'll be applied to every card in the batch.
date values accept common layouts (YYYY-MM-DD, MM/DD/YYYY, Jan 2, 2006, etc.) and are normalized to YYYY-MM-DD before storage.
Validation rules
Applied to verificationData on every issuance request:
- 0 fields on the profile: do not send
verificationData. - 1 field: supply its value for each card.
- More than 1 field,
andlogic: every field must be supplied for each card. - More than 1 field,
orlogic: at least one field must be supplied for each card. - Every
verificationFieldIdmust belong to the resolved profile. - A single card cannot include the same
verificationFieldIdmore than once.
Publishing a profile
As soon as an activation profile with verification fields is published AND assigned as the default at the program or super level, every card issued under that business via the API is subject to it.
If your integration is not already sending verificationData per card, your next issuance request will fail with:
this business has a default activation profile being applied that requires verificationData for field "
Three ways to unblock:
- Add
verificationDatato your API calls. Pick this if you want the activation profile flow going forward. - Pass
applyActivationDefault: false. Skips the default for that specific request. - Remove the profile as default. Clear the
defaultActivationProfileIdon the program (or super) in the dashboard. Existing issued cards keep their attached profile; only new issuance is affected.
Best practice: publish + assign in sandbox first, and only assign as the default in production once your issuance integration is confirmed to send the required verificationData.
The cardholder’s experience:
Physical cards:
- Cardholder scans the card insert or navigates to givecard.com/activate.
- They enter their card details.
- Activation profile screens are displayed (an informational page and/or verification fields).
- The card is activated once they pass these screens.
- (Optional) They create a GiveCard account (email + password, or Google sign-in), or sign in if they already have one. From then on, they use GiveCard's cardholder portal to view card details, lock/unlock the card, check their balance, and see transaction history.
Virtual cards:
- Cardholder clicks on the activation link.
- Activation profile screens are displayed (an informational page and/or verification fields).
- They create a GiveCard account (email + password, or Google sign-in), or sign in if they already have one. From then on, they use GiveCard's cardholder portal to view card details, lock/unlock the card, check their balance, and see transaction history.